Pages

Saturday, 28 June 2014

ten candles and a cupcake

As you know clean and simple isn't really in my repertoire and believe it or not this card starting off being both clean and simple.  I got into a bit of trouble when I decided to borrow an idea from one of my craft enablers (you know who you are) to create the candles.


The background was created by inking painter's tape with distress inks (pumice stone, weathered wood, festive berries and worn lipstick).

I coloured Tim Holtz's cupcake (birthday blueprint) with markers and watercoloured distress inks.


And then I started working on the candles and my simple idea turned into something a bit more complicated (it's just in my nature). 

I die-cut the candles (poppystamps dies picket fence) and decorated each one individually using bits of scrap paper I had lying about.  

The foundational candle layer was die-cut out of sookwang.  The sookwang gave me an easy way to build up layers and to cover the flame with glitter ritz (sand).  I embellished with my trusty and well-loved black gelly roll.


I am entering my cupcake and candles card into Sweet Stamps' Monthly Technique Challenge: Painter's Tape Technique.

Soon to come:  Father's Day cards (yes, I know how late they are but consider them for inspiration for next year or a masculine birthday card), another attempt at a clean and simple birthday (teaser alert: not entirely successful) and, not one, but two memory books for retiring colleagues.

Saturday, 14 June 2014

a fox is a wolf who sends flowers - ruth brown

I have fallen behind in my blog posts.  I suppose there are too many exciting things going on in the everythingshetouches world; unfortunately not all related to crafting.  I recently returned to a previous sector at work after a six month secondment.  There is something really fantastic about being able to temporarily move to a new position: stretch some muscles that have not been used in a long while, meet new people and learn something new-to-you all while having that security blanket of knowing you have somewhere comfortable to return to when it is all over.

I have also started working on two retirement memory books for my colleagues who will be leaving the end of June and middle of July.   I am very grateful for the support and ideas that I have been receiving and I cannot wait to share the end product with you.

And now onto April's Inked Stamper 10-tag swap challenge which was quirky. 


I found the fox stamp at Michaels in the $1.50 bin, added Impression Obsession glasses (cut from black glossy paper) and highlighted the ears and cheeks with watercolour (distress ink tea dye).  Alex and I have been listening to What Does the Fox Say quite a bit lately and it just seemed to fit nicely with April's theme.  I used the fox head as a mask with this fantastic Asian lady themed paper.


The dress form was decorated with a belt mustache and Asian-inspired embellishment.  Seriously cannot have quirky without a stache or two.


Thank you for stopping by and happy crafting.

Thursday, 29 May 2014

you can't stop the waves, but you can learn to surf - jon kabat-zinn

Before I get into describing my tag in this post I am happy to share with you the news that I reached 5000 views!  I am now officially one year and one day into participating and being part of the blogosphere and I am loving it.  I am so grateful for meeting new people who share my passion and so many talented folks who inspire me every day.

Thank you.

Beach is June's Inked Stamper 10-tag swap theme.  I'm not sure if my inspiration was rampant because we just (not really just but I have been mentally returning on occasion ever since) went on a trip to the Caribbean or if when we did return to Edmonton the weather resembled the innards of a refrigerator but I took to June's theme like a seagull to a crab and tackled it with gusto.


I created the background of the tag with my gelli plate, three acrylic paints (beige, grey and pearlescent teal) and die-cut my 10 tags from 3 prints.  I used the Memory Box garden bare branches stencil to get a negative impression resembling ocean coral and layered Impression Obsession's starfish and seashell background stamp on top with black archival ink.  The starfish and the clam got a layer of glossy accents for added interest and dimension.


I learned a neat trick for cleaning my gelli plate at the retreat this spring using glitter and packing tape.  By sprinkling a touch of glitter around dried paint areas on the plate and using the tape to lift up the residue you get a fantastic ribbon of paint and glitter and your plate is lickable clean (not really but it is really darn tidy).


I painted the mermaid's hair using pearlescent watercolours and added a little punch cut shark on the headband for fun.  It was cut out of a Sookwang sheet, covered in latte Glitter Ritz and burnished to get the added shine.  I recently got introduced to Glitter Ritz (where have I been?) and I am seriously hooked.  I want to ritz everything.  Never really a glitter gal (I also own Tim's Distress Glitter which I am simply mad about) in the past I am now part of the converted.  Watch out.

The seashells are from the Recollections embellishment line.  A brilliant idea donated to me by one of my favourite craft enablers.  Merci.


The mermaid tail was cut from patterned paper and dry embossed to achieve a scaly texture.


The chain and beads attached to the burlap strip reminded me of fishing nets and captured treasures. 


I am entering my beach tag into Inkido's May Challenge: the beach is my happy place.

There have been so many projects in the past few months that I find I am falling behind in my posting.  I owe you a whole bunch of posts which I cannot wait to share.  

Thank you for stopping by and, as always, I appreciate your encouragement and kind words.

Sunday, 25 May 2014

never trust people who promise to make you rich in a day. they are generally crazy swindlers ― carlo collodi, pinocchio
May's Inked Stamper 10-tag swap theme was Fairy Tale.  Twinkie Stampotique makes the perfect little Pinocchio and once I decided  Pinocchio was the direction for the swap the rest of the tag design fell into place very quickly.


I die-cut tags out of pearlescent black paper and bricked-up the stage backdrop with my trusty brick stencil, gel medium and acrylic paint.  The curtains (memory box) were die-cut out of a re-purposed dollarstore copy of PinocchioTwinkie was coloured in with pencil crayons and markers and his nose was trimmed from a fallen branch I picked up at the stamp retreat outside of our workroom.  I borrowed the leaf die-cut and green mirror paper to add the perfect final touch to his wooden nose and added fishing line for Pinocchio's strings.


I cut, embossed, distressed (vintage photo) and folded the bottom of the tag to resemble a stage.


I am entering Pinocchio into the following three challenges:
1. Anything But a Card Mini-Challenge this week is Hang It.  Pinocchio is hanging about and finding his way to becoming a "real boy".
2. The Aviary: paper wings productions anything goes and
3. Stampotique Designers Challenge SDC 147: Tags

Tuesday, 13 May 2014

always start out with a larger pot than what you think you need - julia child

One of my good friends purchased (and I borrowed during the stamp camp retreat) the most adorable apron die-cut set from which I created two similar Mother's Day cards.  The die-cut set comes with cooking utensils, sewing equipment and gardening tools giving it an amazing versatility in terms of function and design.  And the apron itself can be cut from grunge or vinyl to achieve a more masculine working man feel.


The spoon, fork and knife were embellishments I found in my stash (I cannot even tell you how old those little gems are; it would be an insult to share their age) and the rolling pin, spatula and scissors were cut from the apron set.  I cut the rolling pin from birch wood paper and white paper, coloured the ends of the white paper red, glued those ends onto the cherry wood and highlighted the entire thing with glossy accents.  The scissors were cut from silver and white papers, the white paper (the scissor handle) was coloured red, filled in with glossy accents and attached to the silver base.  The spatula was also cut from birch wood paper and white paper.  I attached the white end to the birch and filled the birch in with glossy accents.


Version two with different papers:


How adorable is the frying pan?  I added a spoon from my stash and the jump ring from my jewelry reserve.  Thank you ms. pb for the suggestion.  Très authentique!


And thank you for stopping in and sharing your ideas.  

Still to come: quirky tags, fairy tale tags and two cards.  Don't forget to follow me on Instagram and Pinterest for sneak peeks and progress photos.

Right now I'm working on mr. everythingshetouches' birthday card.  I think I might use some of the gelli plate sheets I created last weekend as a background.  Don't tell him that I haven't figured out exactly how the whole thing will work together.  This is one moment when the concept is stuck in concept-mode and is not becoming a finished product in my brain.  Cross your fingers folks that it all turns out great and mr. everythingshetouches is wowed by my craftiness.  No pressure.  It is only a card for one of the most important people in my life.  But I have faith that some distress crackle will free the creative spirit.

Monday, 12 May 2014

42: the answer to the universe and so much more

I am a proud member of a stamping club which means I get some pretty fantastic perks like accessing the creative minds of 42 wonderful ladies and super yummy snacks once a month.

It also means that I have 42 birthday cards to make, 42 Valentine's Day tags and 42 Christmas something-or-others. And for our 15 year anniversary, the club members have decided to create personal information cards to share with each other - which means, you guessed it, another 42. 

My real issue (as people so delicately pointed out): I do not create anything simple which makes creating in bulk more time-consuming and slightly onerous.  There is some direct correlation between the number of layers and items on a card and the time it takes that I cannot seem to absorb.  Perhaps one day I will learn better.

I created the background of my information card by dipping and running a 4 1/4 x 5 1/2 section of watercolour paper through two distress inks (tea dye and weathered wood) on my mat to get the splattered texture look.


I coloured Deep Red Yolanda in with markers and coloured pencils and highlighted the cup and chair background with watercolours using my distress ink (tea dye).


My very good friend brought the geek is the new sexy stamp back from San Diego for me, along with two rolls of washi tape including the glasses that you see on the left of the information card.  I absolutely adore the glasses and coffee washi strips.  The background is clear-ish and so it seems like a floating stamp.  I punch cut the banner on the side.  Gives the card the extra va-va-voom.


This was project one at the stamp club retreat.  Follow me on instagram to get a peak at the other projects coming soon.

Sunday, 4 May 2014

scottie and yolanda birthday wishes

I started working on this birthday card by splattering and dripping silks acrylic glaze (fuzzy peach) onto heavy white cardstock and then highlighting and transforming some of the splatters into little precious flowers with my gelly roll pen (black). 


I added Yolanda (dressed up Deep Red), my little Scottie, two adorable clotheslines and old bits of heart cardstock leftover from Valentine's Day to the shimmered background to create a simple and sweet card for my friend's daughter who turned eight.


I just returned from a stamping retreat.  Fifty-three hours of demos, cropping and laughter surrounded by some of the most talented women I have ever met.  I was guaranteed to walk away with a new idea and mucho money spent on all the new supplies I will need to buy to recreate what projects I saw this weekend.  I can already hear the cash registers ringing across the city.  I had a lot of commitments to complete this weekend: forty-two information postcards to share with my stamping club in honour of our fifteenth year, ten quirky tags, ten fairy tale tags, one birthday card (I have many more but I finished one up) and two Mother's Day cards so there was little time to play, however, I did manage to pull out and paint-up my new Gelli plate.  I also learned a brilliant way to clean off the paint once I was done.  Brilliant.  I will show you the outcome and technique one day soon.

I really cannot wait to share it all with all of you.  Keep an eye out for the many posts.

I am entering this card into Simon Says Anything Goes Challenge this week. 

Sunday, 20 April 2014

a touch of colour and a birthday wish

I cannot believe it has been almost a month since my last post.  The family was "trapped" in the Caribbean with very limited WiFi making any communication back home difficult.  I know it was a sacrifice but I admit I would willing sign up for this type of sacrifice again without hesitation.

It was my mom's birthday and I wanted to create a card which had light, colour and some whimsy.  With the exception of the butterflies scattered around the card, the only area of colour is centralized near the Scottie.  Mom loves dogs and sadly her Chewbaca, an energetic and adorable Fox Terrier and Belgium Sheep-hound mix, has died recently.  The little Scottie is an adorable reminder of great puppy times.


I gave a Julie Nutting page a bit of a white-wash with Gesso to draw attention to the centre of the page and stamped it with blades of grass, Stampendous dandelions and butterflies black&white style.  I coloured the lower half of Yolanda (dressed up Deep Red)and Yolanda's eyes and lips as well as the blades of grass behind her creating a centralized area of pigment.  The punch-cut butterflies add pockets of colour throughout the front of the card.


May will mark my first year bloggiversary.  I have some ideas for how I would like to shape this upcoming year including the start of an Etsy Shop in the Fall and different monthly highlights.  Stay tuned friends!  And thank you for making my first year so amazing and special.  I have truly enjoyed.

 Chewbaca 2000 - 2014

Thursday, 20 March 2014

shabby freya chic

Shabby chic Freya (Octopode Factory) was submitted into February's Inked Stamper 10-tag swap.  I'm pretty sure that if I demonstrated no restraint that Freya would become my go-to gal for all of my creations over the next little while.  And I must admit I love digi-stamps.  I love the choice in sizing and I really adore the consistency in the image lines especially when you are producing en mass.

The tag base was a large Julie Nutting tag.  These tags make a great foundation to any tag design.  Made with heavy cardstock and printed with a non-intruding image you get a great base for your work.  

I distressed the sides of the tag with vintage photo and haphazardly stenciled on some hearts using a soft pink acrylic paint.  I gave the hearts some definition and grounded them onto the tag by outlining them in Dina Wakley style with gelly roll black.

I stapled lace ribbon into place at the bottom of the tag and added two eyelets on either side so that I could suspend a bit of chain.


I used Bo Bunny Pincushion cardstock as a backdrop for Freya and highlighted each strip by distressing the edges with vintage photo.  Freya  was coloured in with a mix of media.  Hair, skin and grey bits were done with coloured pencils.  Green and black items coloured in with markers.  Freya's lips have been brought to you today with gelly roll red.  The three dots (bottom right) were added with Viva Pearl Pen (red).


I added my domestic washi to the side of the tag.  Still loving the tutu-looking one the best, however, I have a vintage stamp that worked out amazingly well for this shabby chic challenge (see top and middle pieces).


I really love how this tag turned out.  Simple yet interesting and dynamic.  And Freya knocked it out the park with her chic-atude. 

Thank you for stopping in.

Thursday, 13 March 2014

lil monster layout

It has been a while since my last layout, however, Dawn (Inked Stamper: Design Challenge #2 Bo Bunny Lil Monster) and Kreative Koncepts Sketch Challenge #23 provided the right motivation.  I have been planning to create a layout for these photos of Alex in his monster towel for over four years (my little monkey was six months old when the photos were taken).

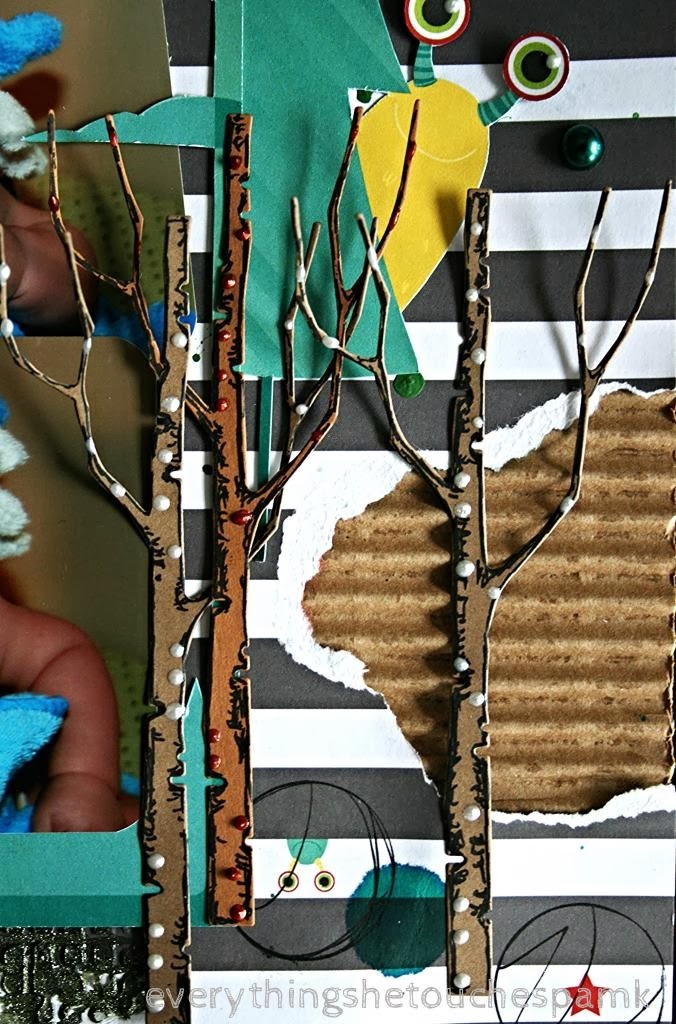
I used the Bo Bunny Lil Monster cardstock as the foundation for my layout.  I love the black and white stripes and you'll get a better look at the little monsters and stars peering over the lines in the photos below.  I circled some of them in the layout to highlight their adorableness. And creepiness; thank you Alex for the correction.  Monsters are not adorable, they're creepy.  Backseat blogger. 

I splattered the background with Dylusions Ink Spray (calypso teal)and green acrylic paint before adding the layers of other stuff.


My favourite part of the layout, if I had to choose one other than my adorable monkey, is the top right corner with the mismatched eyes peering out of the ripped page.  I haphazardly tore shapes on the top right of the page and on the bottom right of the page and layered corrugated cardboard behind both openings.  On the top opening I stapled the cardstock to the cardboard, added embellishments from the Bo Bunny Ephemera pack (pompom string, buttons and google eyes) and two thin bark shavings.  Alex has a genuine interest in nature, particularly rocks (harder to scrapbook), and he picked up a couple of bark shavings under one of the trees outside of his daycare one day.  I thought the authentic bark played nicely with the campy feel of the Bo Bunny adventure sign, treeline and the memory box die cut birch trees on the bottom of the page.  It tied the page together and gave it balance.

Notice the five-eyed monster peeking out in the photo below?  Bo Bunny is one of my ultimate favourite designers.  Somehow, for me, they always seem to get it right.  I'm pretty sure if I took account of my stash I would find Bo Bunny tips the scales in what I own.

While I'm praising Bo Bunny for their designs let me also mention that the Ephemera pack is LOADED with stuff.  No seriously.  It is loaded.  Paper, playing card, ribbons, eyes, brads, buttons, dimensional stick-ons (see the teal one under the pom-pom?) and much much much more.  Loaded in one little pack.


I love the little yellow monster peeking out from behind the tree.  I added some definition to the memory box birch tree die cuts with my black gelly roll pen and my Viva Pearl Pen (ice white and red). 


There is something fantastic about the adventure post and the treeline part of the Bo Bunny cardstock and I played for a bit before deciding to use it as a frame for the two smaller photos of my monkey-monster.  I added Alex's initials to the post as part of a everythingshetouches family tradition of sign carving. 


Mr. everythingshetouches and I traveled to Banff one summer and took the photo below.  I have an absolute fascination with the mountains and love to take bazillions of photos whenever we get a chance to get to the Banff or Jasper.  On this trip we made a few stops along the roadside and I captured the Mt. Kitchener sign in one of my many (bazillions I assure you) photos.  Mr. everythingshetouches digitally added our names to the signage and now keep the photo framed in our living room.


I created a collage out of old magazines and an old tattered anime book and used the Bo Bunny monster shape for a template.  I then highlighted the monster in Dina Wakley style with my black gelly roll to ground the image onto the page.  Have I mentioned that I will be attending a Dina Wakley class this summer at the Inked Stamper?  I am so fabtastically excited.  Already have my Art Journal Freedom ready by the door to bring for signage.  Geek. 


I added texture with gel medium, the memory box mesh stencil and Viva 3D Stamp-Paint (moss green - metallic) under the photos for a little sparkle and pop.


Feels great to be able to squeeze a layout into my crafting (still working on the journal).  I'm close to a year in the blogosphere and my (largely self-imposed) craft obligations are soaring.  I had another idea in the car earlier for an Etsy Shop product.  Did I mention that building an Etsy Shop is on my to-do list?  I would love to get it up and running by the end of October. 

And on a more personal side note, I just selected Alex's K - 6 school.  Hard to believe looking back on these photos that my monkey is ready for Kindergarten.  Hmm.  I should try to schedule that layout for October or November so it doesn't take another five years before I craft his first day at Kindergarten.